0. Overview
1. Structure Your Data Dictionary
2. Build Templates
3. Manual Publish & Distribute
4. Programatic Publish & Distribute
5. Document Edit/Review Workflows
6. Cloud Printing
Overview
0.1 What is Ad Documentum?
Ad Documentum is a cloud-based, secured, end-to-end Customer Communications Management platform for every business. Ad Documentum allows you to customize and automate delivery of your Customer Invoices, Notifications, Bills, Reports, Account Statements, Performance Cards, Notices and more.
Our goal is to allow business users to automate and deliver document communications directly to customers via Email, Fax, Cloud Print and even Direct Mail without having to write any code. Ad Documentum features simple, intuitive user interfaces coupled with maximum functionality.
0.2 Who is Ad Documentum for?
Ad Documentum can be used by any individual or company that needs to deliver a large volume of customizable automated document communications to their customers via Email, Fax, Cloud Print or even Direct Mail. Whether you're a Business Analyst with a large insurance company, sending claims statements to thousands of customers, or an educational institution delivering progress reports to parents, Ad Documentum is the Customer Communications Manager for you.
0.3 What does this user guide cover?
While all of Ad Documentum’s features are built to be intuitive to business users, this guide is for new users, walking you through the entire cycle of document communication automation and delivery.
Structure Your Data Dictionary
1.1 Data Dictionary Basics
Ad Documentum’s data dictionary feature allows you to build a simple tree-like data structure that is meant to mirror your organization’s data architecture. You have complete flexibility to build your data dictionaries as simple or complex as you need them to be.
Data dictionary elements can be added, deleted or renamed by right-clicking on an existing element and selecting the appropriate action from the menu. Any data dictionary element that contains additional data dictionary elements are referred to as ‘parent’ elements. Elements that do not house any additional elements are known as ‘leaf’ elements. Leaf elements can be included in templates as place-holders to house data. Leaf elements will be replaced by actual customer data when the templates are published and distributed as full-fledged document communications.
Each data dictionary can be linked to one or more templates.
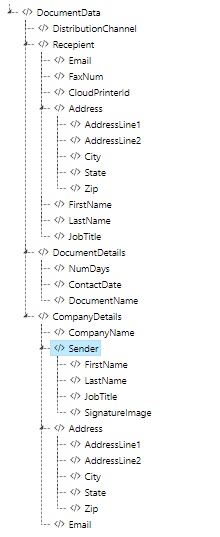
Walk-through #1
Name your data dictionary ‘MyFirstDD’ and add data dictionary elements, so the resulting structure looks like this:
1.2 Adding Sample Data
Sample data can be added to each leaf data dictionary element. Right click on a leaf data dictionary element, and click on 'Add Sample Data'. This is especially useful while previewing templates, wherein each data dictionary element in the template gets replaced with its associated sample data.
Build Templates
2.1 Templating Basics
Ad Documentum's WYSIWYG rich-text, template editor works just like MS Word or Google Docs. Easily build document templates, no matter the document's complexity.
While creating a template, it must be linked to an existing data dictionary. Data dictionary elements can be added to the template by clicking on a leaf data dictionary element. The data dictionary element will be dropped into the template at the cursor's current location within the template. For convenience, the shortened data dictionary element will appear within the template. Hovering over the shortened data dictionary element will display the full data dictionary element.
Template content can be formatted by using the various options in template panel above the template content. Font options include font family and font size. Content can be set to bold/underlined/italicized, subscript/superscript, aligned left/center/right/justified, etc. Paper size is defaulted to 'Letter' for US and 'A4' in other geographies.
Other simple formatting options include text color, background color, increase/decrease indent, bulleted lists, numbered lists, horizontal lines, special characters and page breaks.
Documents can be previewed in real-time by simply clicking on 'Preview' in the template panel. The preview will include the sample data linked to the data dictionary, to give template editors a sense of how exactly the final PDF document will look.
A nifty tip: hit ENTER within the template editor to take the cursor to a new paragraph, and SHIFT+ENTER to take the cursor to a new line.
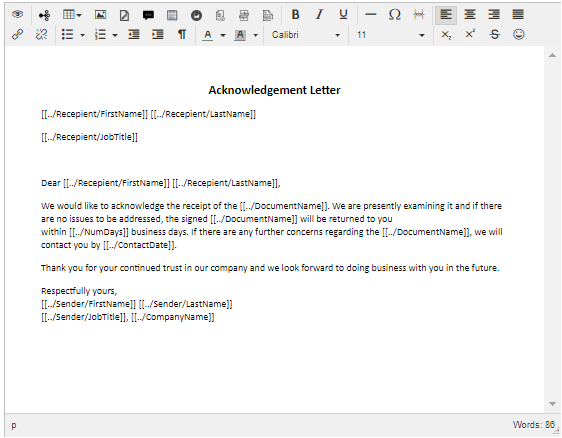
Walk-through #2
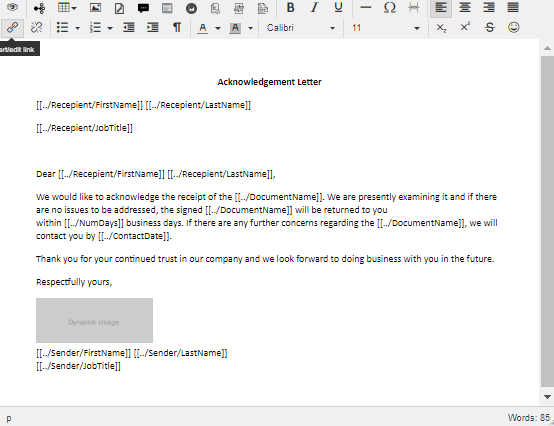
In this walk-through, we will build a simple acknowledgement letter. Name your template ‘SimpleAckLetter’ and link it to 'MyFirstDD' as defined in Walk-through #1. Type out the document template, include the appropriate data dictionary elements in the appropriate positions within the template, and save. The document will look like this within the template editor:
2.2 Distribution Details
Clicking on 'Distribution Details' within the template panel will allow you to set up the distribution details of the selected template.
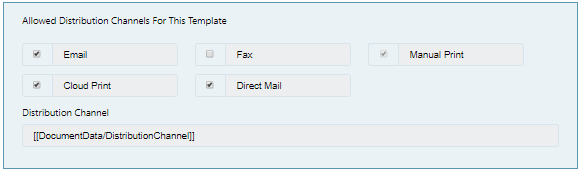
Select allowed distribution channels from: Email, Fax, Manual Print (auto-selected), Cloud Print and Direct Mail. This means each document communication being generated from the template can be distributed via any combination of the allowed distribution channels.
During automated document publish and distribution (via API), the distribution channel(s) for each document communication can be specified by sending the following data in the [[DocumentData/DistributionChannel]] data dictionary element: "EMAIL,FAX,MPRINT,CPRINT,DMAIL" or "EMAIL" or "EMAIL,CPRINT" and so on.
During manual document publish and distribution (via Excel), the distribution channel(s) for each document communication can be selected via checkbox selection.
Email Details (EMAIL): From Email Address/Name, Reply To Email Address/Name, To Email Address/Name, CC Email Address/Name, BCC Email Address/Name can all be filled in by clicking on the appropriate data dictionary element. From Email Address/Name or Reply To Email Address/Name can be hardcoded as static values if you choose. This would just mean that each document communication generated from the template would use the same hardcoded From/Reply To Email value supplied.
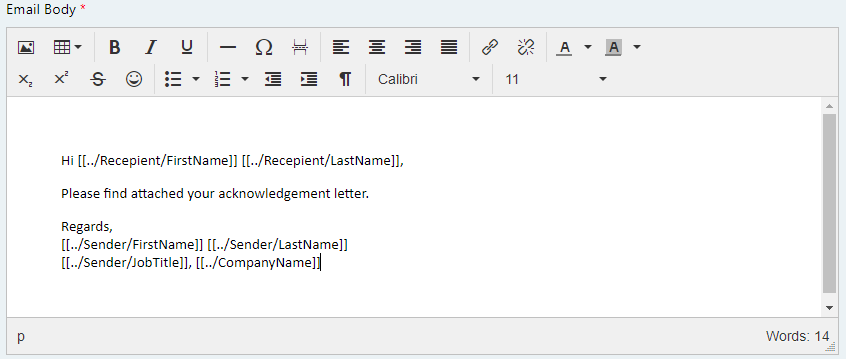
Data dictionary elements can be used in the Email Subject, Attachment Name and PDF Password if required. Also, the Attachment Name must be added without the extension. Ad Documentum will add the '.PDF'. Email Body can be filled in similar to the main template itself. If 'Send Document Template As Email Body' is selected, the Attachment Name, PDF Password and Email Body fields are not required and will therefore disappear.
Fax Details (FAX): Only the recipient's Fax Number is required. A data dictionary data dictionary element should be used for this field. Fax Number must be in ITUT format. That is, Country Code without the leading zero followed by just the fax number. For example: 18005551234
Manual Print Details (MPRINT): Manual Print or Batch Print does not require any details or settings to be added.
Cloud Print Details (CPRINT): Only the Google Cloud Printer Id is required and can be supplied by a data dictionary element or a static/hardcoded value. Google Cloud Printer Id, if hardcoded as a static value, mean that each document communication generated from the template would be sent to the same Cloud Printer as defined by the Cloud Printer Id. If a data dictionary element is used, each document communication can be routed to any of your Cloud Printers on the fly during document publish and distribution. To set up your Cloud Printers, please refer section 12 of this user guide.
Direct Mail (DMAIL): From and To Names and Addresses can be filled in by clicking on the appropriate data dictionary element.
Document color (Color/Black & White) and Print Format (Single/Double-sided) are options that can be set for Direct Mail on a template-level.
Additional Settings: Edit & Review / Only Review workflow options - Can be hardcoded or set as a data dictionary element. The value 'Y' will send the document communication for a Edit/Review or Only Review workflow before publish and distribution. Any other value will bypass these workflows and the document communication will directly be published and distributed. A user must be specified in the field 'Edit/Review User'. This again can be hardcoded or a data dictionary element can be used. Note that the user must have appropriate permissions (Document Edit and/or Document Review, as the case may be). The Edit/Review User must be supplied in lower case and must be an exact match for the user name in the Ad Documentum system.
Search Tags - Any number of data dictionary elements can be used to 'tag' a document communication for archival purposes. Typically, the recipient/customer name or Id number can be tagged and would allow for easy search and retrieval of historical communications in the Communication History section.
Walk-through #3
Click on Distribution Details in the template panel to enter the distribution details of ‘SimpleAckLetter’. Enter the distribution details as follows:
Email Details
From Email Address: [[DocumentData/CompanyDetails/Email]]
From Email Name: [[DocumentData/CompanyDetails/Sender/FirstName]] [[DocumentData/CompanyDetails/Sender/LastName]]
Reply To Email Address: <blank>
Reply To Email Name: <blank>
To Email Address: [[DocumentData/Recepient/Email]]
To Email Name: [[DocumentData/Recepient/FirstName]] [[DocumentData/Recepient/LastName]]
CC Email Address: <blank>
CC Email Name: <blank>
BCC Email Address: <blank>
BCC Email Name: <blank>
Email Subject: Email for [[DocumentData/Recepient/FirstName]] [[DocumentData/Recepient/LastName]]
PDF Password: <blank>
Cloud Print Details
Google Cloud Printer Id: [[DocumentData/Recepient/CloudPrinterId]]
Direct Mail Details
From - Name: [[DocumentData/CompanyDetails/Sender/FirstName]] [[DocumentData/CompanyDetails/Sender/LastName]]
From - Address Line 1: [[DocumentData/CompanyDetails/Address/AddressLine1]]
From - Address Line 2: [[DocumentData/CompanyDetails/Address/AddressLine2]]
From - City: [[DocumentData/CompanyDetails/Address/City]]
From - State: [[DocumentData/CompanyDetails/Address/State]]
From - Zip: [[DocumentData/CompanyDetails/Address/Zip]]
From - Country: United States
To - Name: [[DocumentData/Recepient/FirstName]] [[DocumentData/Recepient/LastName]]
To - Address Line 1: [[DocumentData/Recepient/Address/AddressLine1]]
To - Address Line 2: [[DocumentData/Recepient/Address/AddressLine2]]
To - City: [[DocumentData/Recepient/Address/City]]
To - State: [[DocumentData/Recepient/Address/State]]
To - Zip: [[DocumentData/Recepient/Address/Zip]]
To - Country: United States
Print Color: Black & White
Print Format: Single Sided
Additional Settings
Edit and Review: N
Only Review: N
Edit/Review User: <blank>
Search Tags: [[DocumentData/Recepient/FirstName]] [[DocumentData/Recepient/LastName]]
2.3 Static Images
Static images can be injected into your template by simply uploading an image file and then selecting the appropriate image. Previously uploaded images can be injected into the template by simply selecting the image.
Image options include: Draggable, Align Right, Align Left.
After the image is selected and injected into the template, it can be resized within the template editor.
2.4 Dynamic Images
Dynamic images are placeholder images that can be replaced by a specific image when the document communication is published and distributed.
A dynamic image must be associated with a data dictionary element. During document publish and distribute, the data must contain the image name (eg: 'image2') or the full image image path (eg: http://yourwebsite.com/images/image.jpg)
Image options include: Draggable, Align Right, Align Left. The placeholder image's height and width can be set as required, and can be further resized within the template editor.
Walk-through #4
Open the Image section in the template panel and click on the Dynamic Image tab. Re-size the placeholder image as shown and include the appropriate data dictionary element as shown. Don't forget to save your template.
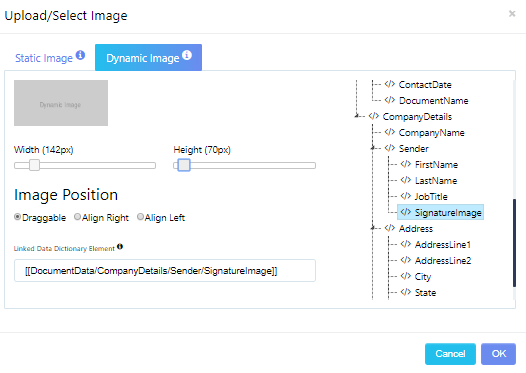
You will see an image placeholder dropped into your template at the current cursor position. At publish and distribute time, this placeholder will be replaced by the 'real' image, as determined by the data. The template will now look as follows.
2.5 Header/Footer
A header and/or footer can be set for each template. Similar to the template itself, rich text formatting options and data dictionary element injection is possible.
Page numbers can be included and positioned within the header or footer.
If you do not want a document header and/or footer, just leave it blank.
2.6 Tables
Tables can be dropped into the template by simply selecting the number of rows and columns required.
Multiple formatting options are available including width, height, border, cell spacing/padding, alignment. Raw CSS is supported as well in the Table Properties/Advanced tab.
Multi-row data is handled automatically. Simply include the appropriate data dictionary element within the table, and the table row will automatically be replicated depending on the number of data elements provided at publish and distribute time.
2.7 Repeatable Content
Repeatable content is template content that can be repeated multiple times depending on the data. Repeatable content can be considered as a sub-template within the template. This sub-template will be repeated as many times as the data repeats.
2.8 Conditional Content
Conditional content is shown if a certain condition is satisfied by the incoming data. Conditional content can be considered as a sub-template within the template. Add a data dictionary element to 'Conditional Element' and a 'Value' to match. Depending on the input data during publish and distribute time, the appropriate section will appear in the finally published document.
Manual Publish & Distribute
3.1 Excel Upload
Ad Documentum allows you to upload your data manually via an Excel spreadsheet. This will initiate publishing the selected template into a document and distribute the same. Every row in the Excel corresponds to a single document communication. So, for example, an Excel sheet with 100 rows (records) of data will result in the publishing and distribution of 100 document communications via the selected distribution channels.
Walk-through #5
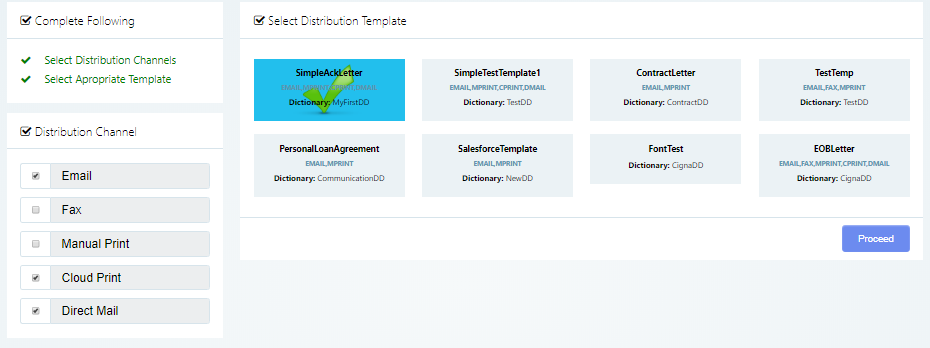
Navigate to 'Pubilsh & Distribute' -- 'Excel / CRM Upload'. Select the 'SimmpleAckLetter' template and select Email, Cloud Print and Direct Mail as the distribution channels.
Drop an Excel file into the file upload pop-up. The Excel file should look something like this (click here), but with real data, of course. The sample Excel file at the link has 3 rows. You can use any number of rows.
Note that there is one pitfall to be mindful of while using Excel spreadsheets to upload data. Data that is numeric, date, currency, etc. gets auto-formatted by Excel. For example, dollar values have the $ removed and so on. It is therefore recommended to put an apostrophe before this type of data in the Excel sheet so that Ad Documentum to read the exact value in the spreadsheet cell.
You will arrive at the screen below where you can match the appropriate data tag to the data column using the drop downs (which can a bit cumbersome) or simply sort the tags to match the data values by clicking 'Sort Data Tags' (which is considerably simpler).
If required, you can do the following prior to validation: (1) edit the data on the screen, (2) disregard one or more row by toggling between Yes/No and (3) change the distribution channels for each individual document communication.
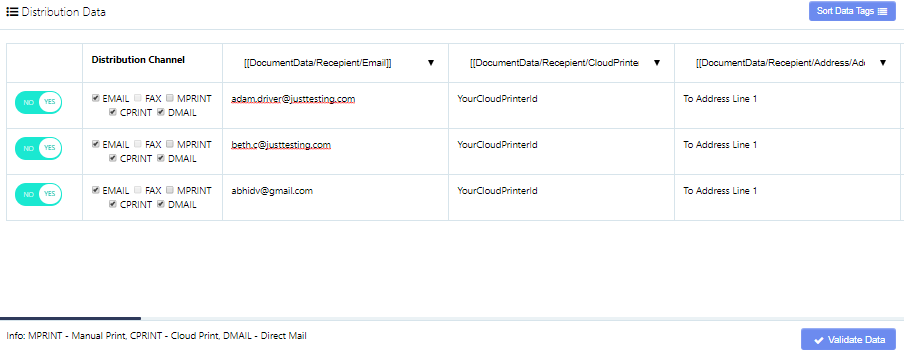
Once the data has been validated, simply hit distribute. Your document communications will be published and distributed to the appropriate recipients by the selected distribution channels.

Walk-through #6
This section covers handling repeating elements in a table. Design your table as shown in the template editor. Note that we will limit ourselves to only the table itself. The remaining template designing aspects have already been covered.
| # | Name | Quantity | Unit Price |
| [[DocumentData/Item/Num]] | [[DocumentData/Item/Name]] | [[DocumentData/Item/Qty]] | [[DocumentData/Item/Price]] |
| Total: [[DocumentData/TotalPrice]] | |||
At publish and distribute time, the repeating tabular data must be sent with a double pipeline (||) separator in the Excel sheet.
DATA DICTIONARY ELEMENT     --    VALUE IN EXCEL SPREADSHET
[[DocumentData/Item/Num]]   --    1||2||3||4
[[DocumentData/Item/Name]]  --    Chair||Table||Plate||Spoon
[[DocumentData/Item/Qty]]   --    4||1||4||8
[[DocumentData/Item/Price]] --    $75||$300||$10||$5
[[DocumentData/Item/Total]] --    $680
The table will populate appropriately based on the number of data items. Any row with repeated data will automatically be replicated. The style and formatting of the table will remain unaltered. The table in the document will appear as shown below.
| # | Name | Quantity | Unit Price |
| 1 | Chair | 4 | $75 |
| 2 | Table | 1 | $300 |
| 3 | Plate | 4 | $10 |
| 4 | Spoon | 8 | $5 |
| Total: $680 | |||
Repeatable content, covered in section 2.7, works in a similar manner.
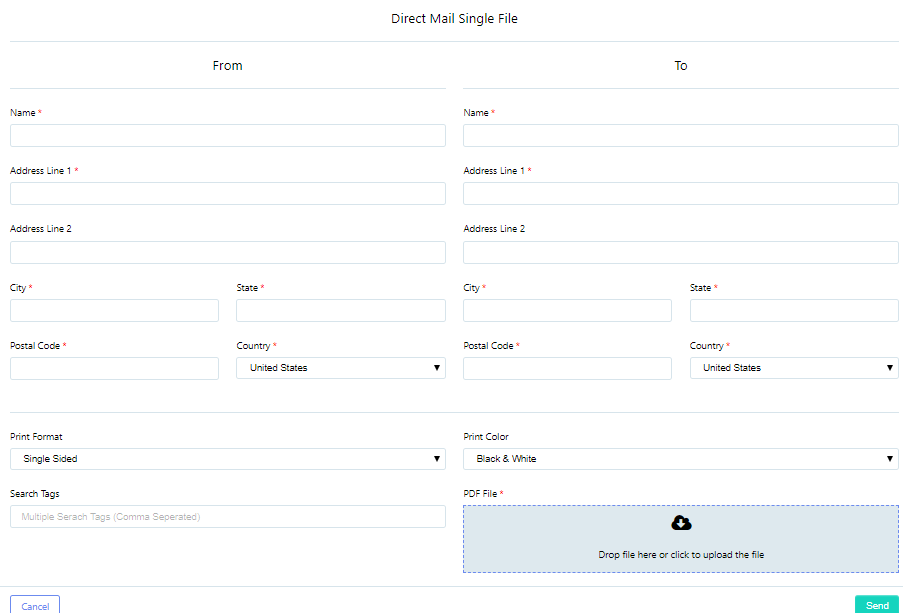
3.2 Direct Mail Single File
The feature allows you to quickly send a single document via Direct Mail (Courier). Navigate to 'Publish & Distribute' -- 'Direct Mail Single File'. Enter the 'From' and 'To' address details, your search tags and upload a PDF document.
Programatic Publish & Distribute
4.1 Automate And Distribute
API endpoint: https://www.addocumentum.com/api/rest/automate-distribute/
This API endpoint allows the merging of template with data to assemble full fledged document communications, and distributes the document communications via any combination of distribution channels. It accepts the following four variables as input parameters: token, key, template and data, all of which are mandatory.
The 'token' and 'key' can be found in the System Admin section. The 'template' refers to the template name and is case sensitive. The variable 'data' is the XML payload in standard string format, without a header. The XML payload must be wrapped in <AdDocumentum> tags as shown below. Each document will correspond to one <DocumentData> tag. Multiple <DocumentData> sections can be sent via one payload. The distribution channel must be any combination of EMAIL,FAX,MPRINT,CPRINT,DMAIL. That is, Email, Fax, Manual (Batch) Print, Cloud Print and Direct Mail (Courier) respectively.
'EMAIL,FAX,MPRINT,CPRINT,DMAIL' or 'DMAIL,CPRINT' or 'EMAIL' or 'EMAIL,DMAIL,FAX' are all valid. Note that this is case sensitive. So please maintain all caps when specifying the distribution channel(s).
Walk-through #7
Here, we will automate the template SimpleAckLetter, and automatically distribute it via Email, Cloud Print and Direct Mail (USPS in US, Canada and most international regions; BlueDart/DHL in select geographies).
The XML structure can be copied from the Data Dictionary section, and filled in with the appropriate data.
<AdDocumentum>
  <DocumentData>
    <DistributionChannel>EMAIL,CPRINT,DMAIL</DistributionChannel>
    <Recepient>
      <Email>ToEmailAddress@ToEmailDomain.com</Email>
      <FaxNum></FaxNum>
      <CloudPrinterId>YourCloudPrinterId</CloudPrinterId>
      <Address>
        <AddressLine1>To Address Line 1</AddressLine1>
        <AddressLine2>To Address Line 2</AddressLine2>
        <City>To City</City>
        <State>To State</State>
        <Zip>To Zip Code</Zip>
      </Address>
      <FirstName>Adam</FirstName>
      <LastName>Driver</LastName>
      <JobTitle>Systems Engineer</JobTitle>
    </Recepient>
    <DocumentDetails>
      <NumDays>5</NumDays>
      <ContactDate>Feb 12, 2019</ContactDate>
      <DocumentName>Claim Letter</DocumentName>
    </DocumentDetails>
    <CompanyDetails>
      <CompanyName>Mega Corp.</CompanyName>
      <Sender>
        <FirstName>Paul</FirstName>
        <LastName>Smith</LastName>
        <JobTitle>Documentation Analyst</JobTitle>
        <SignatureImage>https://addocumentum.com/assets/img/ug/paulsmithsig.jpg</SignatureImage>
      </Sender>
      <Address>
        <AddressLine1>From Address Line 1</AddressLine1>
        <AddressLine2>From Address Line 2</AddressLine2>
        <City>From City</City>
        <State>From State</State>
        <Zip>From Zip Code</Zip>
      </Address>
      <Email>FromEmailAddress@FromDomain.com</Email>
    </CompanyDetails>
  </DocumentData>
</AdDocumentum>
A PHP code snippet follows. Any other programming language will work just as well!
$ch = curl_init();
$token = "your_token";
$key = "your_security_key";
$template = "SimpleAckLetter";
$data = "<AdDocumentum><DocumentData>...................</DocumentData></AdDocumentum>"; //Use above XML as string data.
$myinput = array('token' => $token, 'key' => $key, 'template' => $template, 'data' => $data);
curl_setopt($ch, CURLOPT_URL, 'https://www.addocumentum.com/api/rest/automate-distribute/');
curl_setopt($ch, CURLOPT_RETURNTRANSFER, TRUE);
curl_setopt($ch, CURLOPT_POST, TRUE);
curl_setopt($ch, CURLOPT_POSTFIELDS, $myinput);
curl_exec($ch);
curl_close($ch);
The document below will be sent out by Email, Direct Mail and Cloud Print (as specified in the <DistributionChannel> tag) to the appropriate recipients.
Walk-through #8
This section covers handling repeating elements in a table. Design your table as shown in the template editor. Note that we will limit ourselves to only the table itself. The remaining template designing aspects have already been covered.
| # | Name | Quantity | Unit Price |
| [[DocumentData/Item/Num]] | [[DocumentData/Item/Name]] | [[DocumentData/Item/Qty]] | [[DocumentData/Item/Price]] |
| Total: [[DocumentData/TotalPrice]] | |||
At publish and distribute time, send the XML data as follows.
<AdDocumentum>
<DocumentData>
        ....
	....
        ....
	<Item>
		<Num>1</Num>
		<Name>Chair</Name>
		<Qty>4</Qty>
		<Price>$75</Price>
	</Item>
	<Item>
		<Num>2</Num>
		<Name>Table</Name>
		<Qty>1</Qty>
		<Price>$300</Price>
	</Item>
	<Item>
		<Num>3</Num>
		<Name>Plate</Name>
		<Qty>4</Qty>
		<Price>$10</Price>
	</Item>
	<Item>
		<Num>8</Num>
		<Name>Spoon</Name>
		<Qty>4</Qty>
		<Price>$5</Price>
	</Item>
	<TotalPrice>$680</TotalPrice>
</DocumentData>
</AdDocumentum>
The table will populate appropriately based on the number of data items. Any row with repeated data will automatically be replicated. The style and formatting of the table will remain unaltered. The table in the document will appear as shown below.
| # | Name | Quantity | Unit Price |
| 1 | Chair | 4 | $75 |
| 2 | Table | 1 | $300 |
| 3 | Plate | 4 | $10 |
| 4 | Spoon | 8 | $5 |
| Total: $680 | |||
Repeatable content, covered in section 2.7, works in a similar manner.
4.2 Direct Mail Distribute
API endpoint: https://www.addocumentum.com/api/rest/direct-mail-distribute/
This API endpoint accepts a single Base64 encoded PDF file along with From/To address details and automatically delivers the file by Direct Mail (Courier). USPS in US and most international countries, BlueDart/DHL in select geographies. The input parameters are as follows. The parameters with a red star are required while others are optional.
token* and key*: Can be found in the System Admin section under the Security tab.
fileBase64*: The PDF file in Base64 format. It must be a PDF.
fromName*: The sender's name.
fromAddressLine1*: The sender's address line 1.
fromAddressLine2: The sender's address line 2.
fromCity*: The sender's city.
fromState*: The sender's state.
fromZip*: The sender's zip code.
fromCountry*: The sender's country code. Extremely important that this is the 2 letter ISO country code in all caps. US for United States, CA for Canada, IN for India, etc.
toName*: The recipient's name.
toAddressLine1*: The recipient's address line 1.
toAddressLine2: The recipient's address line 2.
toCity*: The recipient's city.
toState*: The recipient's state.
toZip*: The recipient's zip code.
toCountry*: The recipient's country code. Extremely important that this is the 2 letter ISO country code in all caps. US for United States, CA for Canada, IN for India, etc.
toContact: The recipient's contact number.
printColor: 0 for black & white and 1 for color. Since it is an optional parameter, it will default to 0 (i.e. black & white) if not set or set to any value other than 1.
printFormat: 0 for single sided and 1 for double sided. Since it is an optional parameter, it will default to 0 (i.e. single sided) if not set or set to any value other than 1.
tags: Any number of keywords that help you search & retrieve the document communication in the Communications History dashboard. Space separated.
A PHP code snippet follows. Any other programming language will work just as well!
$ch = curl_init();
$token = "your_token";
$key = "your_security_key";
$fromName = "Levi Strauss & Co.";
$fromAddressLine1 = "1155 Battery St.";
$fromAddressLine2 = "Level 13, Concorde Tower";
$fromCity = "San Francisco";
$fromState = "CA";
$fromZip = "94111";
$fromCountry = "US"; // 2 letter ISO country code, all caps. US for United States, IN for India, etc.
$toName = "Mike Recipient";
$toAddressLine1 = "40 Newport Parkway";
$toAddressLine2 = "#302 Parkside West Apt.";
$toCity = "Jersey City";
$toState = "NJ";
$toZip = "07310";
$toCountry = "US"; // 2 letter ISO country code, all caps. US for United States, IN for India, etc.
$toContact = "2015557686";
$colorPrint = 0; // 0 - Black & White, 1 - Color
$printFormat = 0; // 0 - Single Sided, 1 - Double Sided
$encodedFile =  base64_encode(file_get_contents("http://yourdomain.com/files/yourfile.pdf")); //Must be a PDF file
$tags = "Mike Recipient 23414"; // Keywords for search & retrieval in Communications History dashboard. Space separated.
$myinput = array('token' => $token, 'key' => $key, 'toName' => $toName, 'toAddressLine1' => $toAddressLine1,
        'toAddressLine2' => $toAddressLine2, 'toCity' => $toCity, 'toState' => $toState,
        'toZip' => $toZip, 'toCountry' => $toCountry, 'fromName' => $fromName,
        'fromAddressLine1' => $fromAddressLine1, 'fromAddressLine2' => $fromAddressLine2,
        'fromCity' => $fromCity, 'fromState' => $fromState, 'fromZip' => $fromZip,
        'fromCountry' => $fromCountry, 'printColor' => $colorPrint, 'printFormat' => $printFormat,
        'tags' => $tags, 'fileBase64' => $encodedFile);
curl_setopt($ch, CURLOPT_URL, 'https://www.addocumentum.com/api/rest/direct-mail-distribute/');
curl_setopt($ch, CURLOPT_RETURNTRANSFER, TRUE);
curl_setopt($ch, CURLOPT_POST, TRUE);
curl_setopt($ch, CURLOPT_POSTFIELDS, $myinput);
curl_setopt($ch, CURLOPT_HEADER, FALSE);
curl_setopt($ch, CURLOPT_SSL_VERIFYPEER, FALSE);
curl_setopt($ch, CURLOPT_HTTPAUTH, CURLAUTH_ANY);
curl_exec($ch);
curl_close($ch);
Document Edit/Review Workflows
5.1 Only Review
When a document communication is set for 'Only Review', the document is not sent to the recipient immediately during publish and distribute, but instead goes through a review process. The document is redirected to a designated document reviewer.
All aspects of the document, including the document itself, distribution channel details, etc. can be reviewed and either approved or rejected. Upon approval the document will be sent to the recipient(s) via the appropriate distribution channels.
In the template, under 'Destribution Details' / 'Additional Settings', the value under 'Only Review' can be set to a literal 'Y', in which case all document communications generated from the document template will go through a review workflow. Instead, a data dictionary element can be used in the 'Only Review' field. In this case each document communication will be directed to a review workflow if and only if the data dictionary element has the value 'Y' at publish and distribute time.
The field 'Edit/Review User' must contain the exact, case sensitive username within Ad Documentum. This can be a literal (eg: abhishek@addocumentum) or a data dictionary element (eg: [[DocumentData/Internal/ReviewUser]])
5.2 Edit and Review
When a document communication is set for 'Edit and Review', the document is not sent to the recipient immediately during publish and distribute, but instead goes through an edit and review process. The document is redirected to a designated document editor.
All aspects of the document, including the document itself, distribution channel details, etc. can be edited. After editing the document communication, the document will be sent for a further review by selecting a document reviewer. After the review, upon approval, the document is sent to the recipient(s) via the appropriate distribution channels.
In the template, under 'Destribution Details' / 'Additional Settings', the value under 'Edit and Review' can be set to a literal 'Y', in which case all document communications generated from the document template will go through an edit and review workflow. Instead, a data dictionary element can be used in the 'Edit and Review' field. In this case each document communication will be directed to an edit and review workflow if and only if the data dictionary element has the value 'Y' at publish and distribute time.
The field 'Edit/Review User' must contain the exact, case sensitive username within Ad Documentum. This can be a literal (eg: abhishek@addocumentum) or a data dictionary element (eg: [[DocumentData/Internal/ReviewUser]])
Cloud Printing
6.1 Setting Up Your Cloud Printers
Ad Documentum uses the Google Cloud Print infrastructure to route document to your designated printers. Your cloud printers can be set up at https://www.google.com/cloudprint
Go to https://www.google.com/cloudprint/learn to learn how to identify and set up your cloud printers.
6.2 Connecting Your Cloud Printers To Ad Documentum
Simply navigate to Print / Cloud Print in the navigation menu and click on 'Link Google Cloud Print account'.
More than one Google Cloud Print accounts can be linked if you are printing across multiple locations/geographies. Once a Google Cloud Print account is linked, you can view the linked printers along with their unique ID. This unique ID determines which printer to route the document communication to. Section 2.2 details how to set the Google Cloud Printer Id for each template.
6.3 Manual/Batch Print
The Manual/Batch Print screen simply merges all the files within a given batch that are marked for Manual Printing (MPRINT). This 'batch' file can be opened and printed at once.
Government and Utilities
Government is one of the most complex and challenging sectors and yet one of the most rewarding as the systems could be implemented on a large scale upon solving core complexities, one of which lies in the document automation space. Governments are required to send huge amounts of physical/digital communications and notifications to their citizens. This is where Ad Documentum is particularly useful, as it allows government associates to easily create new modes of document correspondences that could be automatically processed and distributed smartly to recipients across the world. This delivery mechanism is so fast, efficient and completely automated. This saves huge amount of time, man hours and cost which could be qualitatively used for other core functions.
Further, the state’s and union’s utility department can easily create new formats of bills, circulars and notifications, the delivery of which is handled by Ad Documentum in an end-to-end manner, giving them the ability to develop their full potential, invest wisely and become more valuable. Thus the utility segment can evaluate market trends and instill a high-performance culture and decision-driven organization throughout their business. Increase the operating performance in transmission and distribution, field force and other areas.
Similarly, aerospace and defense firms are facing several industry changes. Aerospace companies are experiencing a rebound in demand from emerging markets and the replacement of developed market aircraft fleets. Defense firms face a declining budget environment in several countries and shifts in how and what governments are purchasing. Ad Documentum is a comprehensive document automation product built to help aerospace, defense and space markets address pressing industry challenges and implement pragmatic solutions to fuel growth.
Social and Public Sector
In order to thrive in a changing global environment, social and public sectors face tremendous challenges that need to be tackled while wisely using limited funds. The non-profit, social and public sectors play a significant role in the global economy, and in the lives and livelihoods of people around the world. Ad Documentum solves one the most critical components, namely document automation and communications. This online product is the most cost effective end-to-end document automation application in the world. It allows public and social sectors to make new modes of document templates that could be automated and delivered across targeted clusters. Moreover, it is a powerful tool that could be used for internal communications and notifications as well. As Ad Documentum is building network across the globe, any type of correspondence, notifications, communications, invoices, banners, etc. could be created and distributed internationally in a simple and quick manner.
We partner both with global organizations firmwide and with vendors at the local level. Many of these partnerships are multi-year, multi-faceted relationships that deliver substantial and enduring improvements.
Transportation and Logistics
The transportation and logistics sector, a very large and growing market, includes pure modal transportation, intermodal connections, and special networks. These businesses see volatile price dynamics and various megatrends, and to remain competitive, players in this industry need to continually transform themselves to offer optimal value through their strategic placement of services. In this interdependent business environment, Ad Documentum can assist the transportation and logistics industry by being a horizontal document automation platform. This involves newer modes of document and correspondence types to be built around these factors. Ad Documentum caters to the needs of various levels of express, parcel and post companies, trucking companies, third-party logistics providers, railways, port operators, ocean shippers and distributors by allowing them to easily create and distribute these automated correspondences globally.